How to Send Emails to Multiple Recipients from a Joomla Contact Form

When people use a contact form on your website, it can be challenging to direct the emails to the right person. Instead of reaching the correct department or team member, emails often end up in a single, cluttered inbox.
With this guide, I will show you how to build a smarter Joomla contact form that utilizes email routing to send emails to the right people — no more guessing games.
We will start by creating a simple form that emails the website's owner when someone submits it. From there, we'll add a touch of magic with an autoresponder, sending users a confirmation email to let them know their message has been received.
But the best part? We will use something called conditional logic for email routing and guarantee emails go straight to the right department. So, if there’s a sales question, it goes to the sales team. If they have a billing question, it goes to the billing department. If they need help with tech stuff, it goes to the tech support team. It’s like having a super-smart sorting hat for emails!
We will also introduce the concept of reusable forms—a single form placed across multiple articles that automatically emails the person who wrote the article. This is a game-changer for anyone running a multi-author blog or content-rich site.
By the end of this article, you'll know how to use conditional email routing and make your Joomla contact form super smart so every email goes exactly where it needs to go.
Why Email Routing Matters
When all emails go to the same place, like "[email protected]", it can be hard to know who's writing to you or why. You have to figure out who sent each one and what they want. This takes a lot of time and can be super confusing.
If you have to forward each email to the right person by hand, it can be annoying and easy to mess up. You might send an email to the wrong person, or someone might not get the email they need. This can cause big delays, and people might have to wait long to get a response.
Email routing helps by automatically sending emails to the right person or team. It’s like having a smart sorting machine that knows exactly where each email should go. This way, emails are handled faster, everyone knows what to do, and there's less stress.
Choose the Right Contact Form Joomla Extension
When it comes to picking the right Joomla contact form extension, you want something that's both powerful and easy to use. The Joomla marketplace offers many form builder extensions, but not all are created equal. Most of them can send emails, and many allow you to set "To," "CC," and "BCC" options for recipients. However, not all extensions offer the same level of advanced functionality and ease of use.
To make the best choice, you should consider a few key factors:
- Conditional Logic: This allows you to set rules determining what happens when a user selects certain options. It’s a great way to route emails to the right people.
- Smart Tags: These tags let you pull information from your website or form submissions, making it easier to personalize your emails and tasks.
- Dynamic Fields: These fields can change based on user input or conditions. They are useful for creating forms that adapt to your needs without extra coding.
- Anti-Spam Protection: Look for a form builder with a built-in antispam mechanism, such as a honeypot, ensuring you only get real messages from real people.
- Requires Zero Coding: Look for extensions that don't require you to write code to make them work for basic tasks. This makes setup and maintenance easier for everyone, no matter their skill level.
Get Convert Forms
For this tutorial, we will use Convert Forms, the best Joomla contact form manager extension in the market. It can help you build contact forms, payment forms, registration forms, calculator forms, and newsletter forms to grow your audience.

Its live preview form builder in the backend lets you see how your form will appear on the front end in real time. Start quickly with pre-built form templates to save time and ensure your forms are fully responsive and look great on any device.
You can manage all your form submissions in one place for a streamlined workflow. Automatically send responder emails when someone submits your form, using smart conditional logic to show or hide fields and send emails based on user responses. Add dynamically calculated fields based on user inputs and ensure users provide information in the correct format with input masks.
Convert Forms integrates with popular CRM apps like MailChimp, Hubspot, and Salesforce, allowing you to connect your forms to existing workflows. You can convert submitted data into PDFs and send them as email attachments.
Track form submissions using your Google Analytics account and protect your forms from spam with reCAPTCHA, Honeypot, and other tools. Embedding your forms is easy, whether you want them in articles, pages, modules, popups, or footers.
Many features and functionalities mentioned in this article are available even with the free version of Convert Forms. Installing Convert Forms Free is straightforward; you can do it directly from your Joomla dashboard.
- From the main menu in the sidebar, click System → Install -> Extensions
- Click the Install from Web tab.
- Search for “Convert Forms”
- Click Install

Once you have Convert Forms installed, let’s proceed to the next step.
Setup a Basic Contact Form
Before discussing email routing details, let's create a simple contact form that notifies the site’s administrator via email and sends an autoresponder message to the user who fills out the form.
- From your Joomla dashboard, go to Components → Convert Forms
- Click New from the toolbar. This will open the Convert Forms Library.
- Search for “contact form” in the search input.
- Pick any template from the list and click Insert.
Send a Notification Email to Admin
Convert Forms manages all tasks executed after form submission, including emails in the Tasks section.
Tasks are automated recipes built by the user. They consist of an app, a trigger, and an action. A task effectively tells, “If this happens, then do that. " For example, upon receiving a new submission, add a new lead to MailChimp, update a contact in HubSpot, or, in our scenario, send an email notification to the administrator. To learn more about this fantastic feature, visit the Working with Tasks article.
To set up a new Email, click Create Your First Task. This starts the process of creating a new task.

Next, you'll encounter a dialog displaying a list of apps. Search for the "email" app. Your screen should resemble the following:

In the next screen:
- Name your task so you can refer to it later. Enter a descriptive name in the input at the top of the dialog's header. For this case, we'll name it "Notify Administrator".
- Select New Submission in the Trigger option.
- Select Send an Email in the Action option.
- Click Continue.

After selecting the trigger and action, the next step is configuring the email. In this section, you'll find settings for the subject line, recipient's email address, body of the email, and any attachments you wish to include.
Among these settings, the "To" property is crucial as it specifies the recipient's email address. The "To" field can be configured to accept a fixed email address, mapped to a form field, or utilize a Smart Tag that returns a valid email address.
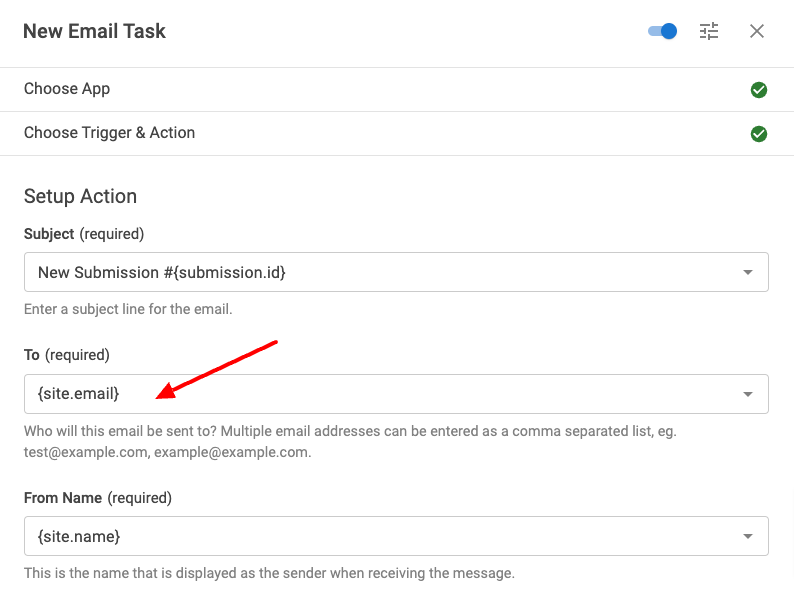
In our scenario, we aim to email the site’s administrator. The "Send an Email" action simplifies this process by prefilling all necessary settings. By default, it's configured to send a notification email to the site's email address, achieved by mapping the “To” property to the {site.email} Smart Tag. This Smart Tag outputs the email address configured in the Joomla global configuration page.
if you need to send it to a different address, you can simply type the email into the input field.
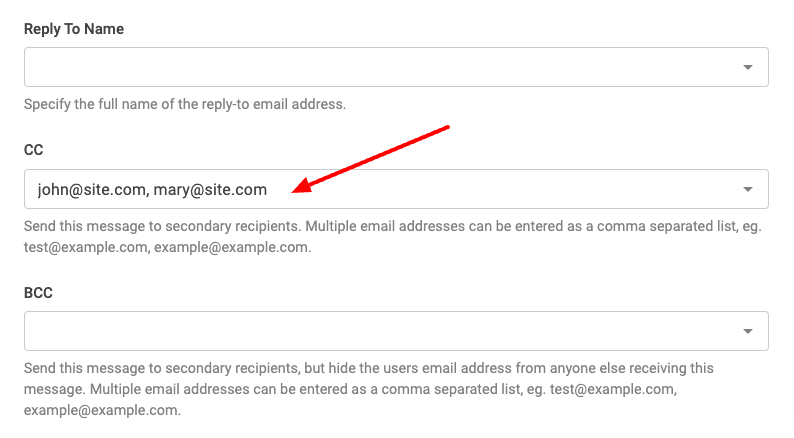
Optionally, if you're collaborating on your site with a partner, you might want them to receive a carbon copy of the email. You can easily achieve this by including their email address in the CC (carbon copy) field. For multiple emails, just separate them with a comma.
You can see an example of this in the screenshot below.
Enable the task by clicking on the toggle at the top right corner of the dialog and click Save.
Our form is now configured to email the site owners automatically. However, a crucial component still needs to be addressed: ensuring a personalized touch and immediate acknowledgment for those who submit your form.
Send a Confirmation Email to the Submitter
Email confirmations serve as a digital handshake between your website and its users. They confirm users' actions and provide a sense of security and trust. Consider purchasing an iPhone online and not receiving a confirmation email; it would undoubtedly undermine confidence. This underscores the necessity for an autoresponder email sent to the user upon form submission.
Let's repeat the steps in the previous section to create the user autoresponder email.
- Go to the Tasks section
- Click Create Task
- Select the Email app.
- Name the task as “User Autoresponder”.
- Select New Submission in the Trigger option.
- Select Send an Email in the Action option.
- Click Continue.
As we observed previously, the email task automatically maps the To property to the {site.email} Smart Tag. To direct the email to the user who submitted the form, we need to map the “To” property to one of the form fields that captures the email address provided by the user during submission, which, in our case, is the Email Address field.
Select the Email Address field in the To option.

Next, let’s add a bit of personalization to the email.
Change the Subject option to something like:
We’ve received your submission #{submission.id}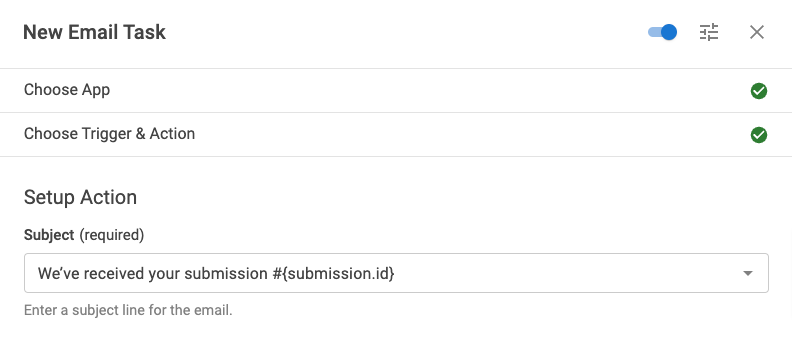
Here, the {submission.id} represents the unique ID of the submission.
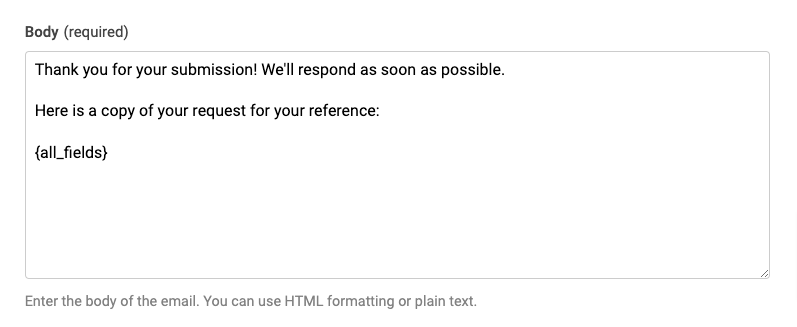
Next, scroll down to the Body option and set it to something like:
Thank you for your submission! We'll respond as soon as possible.
Here is a copy of your request for your reference:
{all_fields}
The {all_fields} is a handy Smart Tag that outputs the user-submitted data in a list format.
Your screen should look like this:
Enable the task by clicking on the toggle at the top right corner of the dialog and clicking Save.
Excellent! We've configured a contact form that sends notification emails to the administrator and partners while setting up an autoresponder to acknowledge form submissions. Let's move on to the next section, where the real magic unfolds. We'll explore how to route emails to different departments based on a dropdown selection.
Route Emails to Dynamic Recipients Based on Dropdown Value
Suppose your company has three departments, each with its email address. With just one form available on your website for visitors to leave messages, the challenge arises: How can you ensure that each department is notified only if the submission pertains to them?
This section will explore two methods of routing emails to specific departments based on a dropdown selection. We'll examine the advantages and disadvantages of each approach, with particular emphasis on how they store and retrieve departmental email addresses.
Set up the Department Selector Field
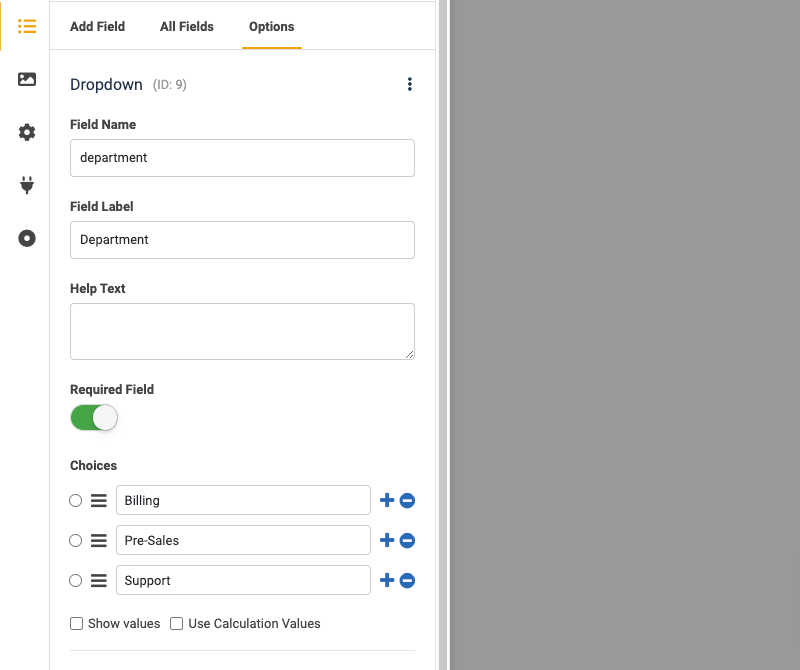
Before discussing the details of the dynamic email routing, we need to add a department selection field to our form. We'll introduce a dropdown field offering Billing, Pre-Sales, and Support options.
Let’s add the dropdown field to our form:
- Navigate to the Fields section in the left sidebar.
- Click on the "Add Field” tab.
- Select "Dropdown" to include a dropdown in the form.
- Set the Field Name to “department”.
- Set the Field Label to “Department”.
- Scroll down to the Choices section and add the following three options:
- Billing
- Pre-Sales
- Support
Your screen should resemble the following:
We've successfully integrated the department selector field into our form, yet we still need to assign each department the respective email addresses. How can we accomplish this?
Let’s explore the first method to achieve this goal.
Method 1: Store Email Addresses in the Dropdown Field
This method involves using the Separate Values option and assigning a unique email address to each dropdown option within our Department field.
Here are the steps to do so:
- Assuming you’re still in the Department field settings
- Check the Show Values box available below the Choices section.
- Add the email address of each department in the input below the label.
Your screen should resemble the following:

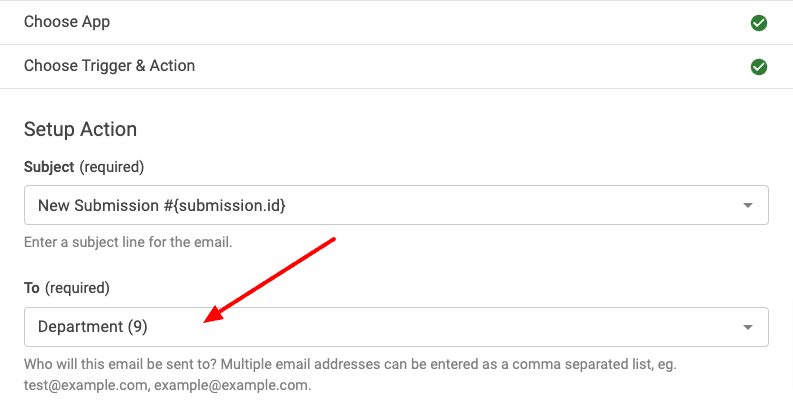
Next, we need to create a new Email task as we did in the Send a Confirmation Email to the Submitter section, but in this case, we need to pull the recipient’s email address from the Department field.
- Go to the Tasks section
- Click Create Task
- Select the Email app.
- Name it as Department Routing
- Select New Submission in the Trigger option.
- Select Send an Email in the Action option.
- Click Continue.
All we have to do is select the Department field using the To option.
Enable the task by clicking on the toggle at the top right corner of the dialog and click Save.
That’s all! Now, your contact form can send emails to dynamic recipients. Let’s examine the pros and cons of this approach below.
PROS
- Efficiency: It’s super fast to configure, as we only need to set up a single email task for all departments.
- Scalability: It’s easy to scale, as adding a new option to the Department dropdown is enough for the department to start receiving emails.
CONS
- Privacy Concerns: If privacy is a concern, this method may not be suitable, as email addresses can be visible by inspecting the page's source code. (Workaround with the Email Cloaking plugin)
- No Customization Options: This approach results in all recipients receiving the same email. Therefore, you can’t have a different subject or email body for each department.
- Dependency on Form Field: Relying on a form field to pull the recipient’s email address is unreliable. If you accidentally remove the field from the form, your emails will stop working, and if you remove a dropdown option, the department will stop receiving emails.
- Data Integrity Concerns: The value of the Department field associated with the submission stored in the database is the department’s email address instead of its name. This may be an issue if your form sends submission data to a third-party app.
Method 2: Conditional Email Routing
We've been setting up emails in the Tasks section using the Email App. Now, let's talk about a cool feature called Conditional Logic. It enables tasks happen only when certain conditions are met, like if a user's email matches a specific domain or if they're in a particular Joomla User Group.
Since we will use this cool Conditional Logic to determine where emails should go, we no longer need those email addresses in the Department dropdown. And let's ditch that Department Routing task we made earlier, too.
- Go back to the form and click to edit the Departments dropdown.
- Remove the email addresses from the option values we added in the previous section.
- Go to the Tasks section
- Remove the Notify Departments task.
To get this method up and running, we'll have to set up a distinct Email task for each of our three departments. Let's begin by creating the Email for the Billing department.
- Go to the Tasks section once again.
- Click Create Task
- Set the task’s name to Billing Email Notification.
- Select the Email app.
- Select New Submission in the Trigger option.
- Select Send an Email in the Action option.
- Click Continue.
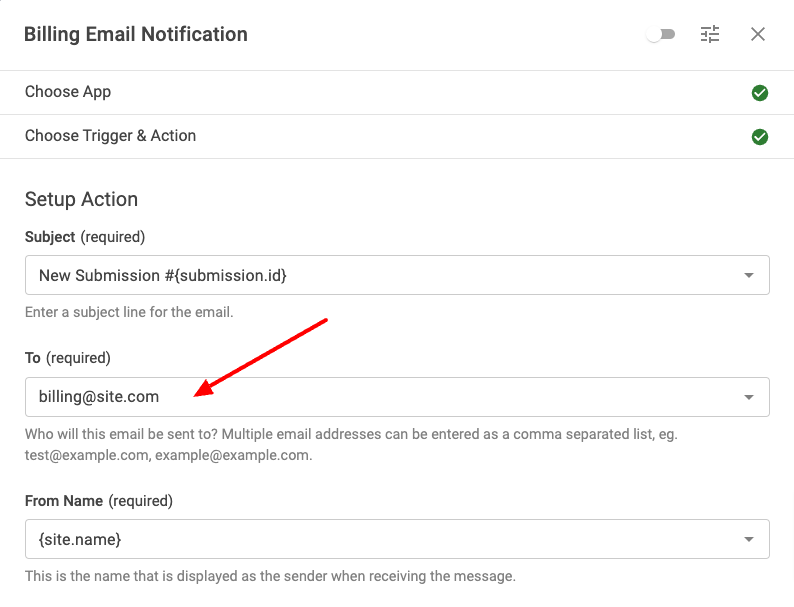
- Enter the billing department's email address using the To option. For this example, the email address is set to [email protected]
Your screen should look like this:
Next, we must tell the task to execute only when the user selects the Billing department in the respective dropdown. To do so, scroll down to the Conditional Logic section and click to enable it.
- Click Add Your First Condition
- Select Department in the Trigger option
- Select Equals in the Operator option
- Select Billing in the third option.
Your screen should look like in the screenshot below:
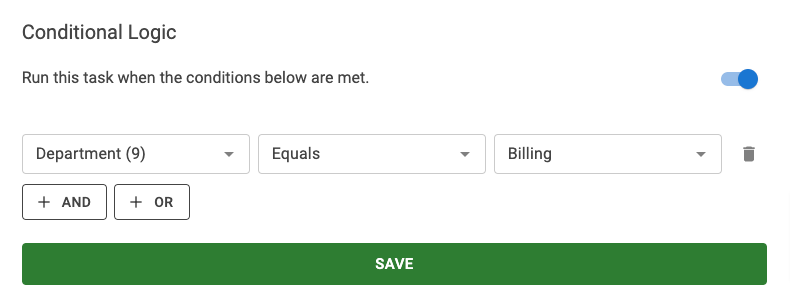
Enable the task by clicking on the toggle at the top right corner of the dialog and click Save.
Our email task is now set up and ready to go! From now on, whenever someone selects the Billing department, the corresponding billing department email address will automatically receive the form submission. We can use the same steps to create the emails for the rest of our departments.
Let's see the advantages and disadvantages of this approach below, contrasting it with the previous method.
PROS
- Enhanced Privacy: Unlike the previous method, email addresses configured within the Tasks section are protected and not exposed in the page's source code. This safeguards privacy concerns, as email addresses remain hidden from inspection of the page's source.
- Customization Options: Each department's email can be tailored individually, allowing customization of the subject line, CC recipients, and message content. This flexibility enables hiding specific information from certain departments for privacy reasons.
- Multiple Conditions: We can set up multiple conditions for triggering an email, providing greater control over when emails are dispatched.
- Independence from Form Fields: This method does not rely on form fields to retrieve email addresses, reducing the risk of errors or inconsistencies.
CONS
- Limited Scalability: This approach may only fit organizations with a few departments. Adding new departments requires adding dropdown options and configuring new Email tasks in the Tasks section.
- Task Management Overhead: Managing multiple tasks for each department can become inefficient, particularly for companies with many departments, as it consumes time and resources.
Alright, we looked into different ways to use dropdown fields to send emails to different departments. Cool, right? Now, let's try something different. Instead of picking recipients based on a form field, we'll use the email address of the person who wrote the article you're reading. In other words, the author of the currently viewed article will determine the recipient's email address.
Email the Author of the Article
Imagine you've got a blog overflowing with killer content, thanks to your amazing writers. To make things even better, you want to add a super-easy contact form to every article so readers can contact directly with the author. But how do you get those messages to the right person without a million different forms?
Placing your form on different pages and articles with shortcodes or modules in Convert Forms is a breeze. We all know that by now. But emailing authors automatically? This can get a bit tricky.
In the previous section, selecting the appropriate field in the To option to route the email to the right department was easy. Now, you need something that magically finds the author's email every time.
Solution: The {article} Smart Tag
The Joomla Content Smart Tag allows you to extract details from a Joomla article, including custom fields, images, and information about the author, such as their ID and email address.
How to make it work:
- Go to the Tasks section of the form
- Create a new Email task or click to edit an existing one.
- Put this magic code in the "To" field: {article.user.email}
This special Smart Tag will find the author's email address for each message, ensuring they get notified every time someone uses the form.
Don’t forget to enable the task by clicking on the toggle at the top right corner of the dialog and click Save.
Excellent! We've seen how to direct emails to recipients through dropdown fields and based on the person who wrote an article.
But hold on. A crucial element remains. We must ensure those emails land in the inbox, not the spam folder. Nobody wants their message to get lost.
Ensuring your email avoids the spam folder
To make sure your email lands in the right inbox, here are some important tips to keep in mind:
- Match Your Domain: Your email address matches your website's domain. Consider setting up a dedicated email address like [email protected] for this purpose.
- Separate Addresses: Your TO address should always be different from your FROM address. This practice can raise red flags and increase the likelihood of your email being flagged as spam.
- Clear Reply-To: If you specify a REPLY-TO address, ensure it differs from your TO address to avoid confusion and potential spam triggers.
- Subject Line Magic: Craft clear, concise subject lines that accurately reflect your email content. Avoid excessive exclamation points, all caps, and misleading information.
- Optimize Recipient Lists: While including multiple recipients in the TO field is tempting, consider using CC and BCC fields for additional recipients, especially for large lists (50 or more recipients). This helps prevent triggering spam filters.
- Minimize Links: Include only relevant links and avoid shortening them with URL shorteners. High-quality, relevant links are less likely to be flagged as spam.
- Authentication Matters: Set up email authentication protocols like SPF, DKIM, and DMARC. These protocols verify your identity as the legitimate sender, reducing the chances of spoofing and spam filtering.
- Leverage SMTP for Sending: Consider using a dedicated SMTP server for improved deliverability. SMTP offers better control over authentication, encryption, and spam filtering compared to relying on your web server's settings.
- Test Your Emails: Before hitting send, test the spam score of your emails using tools like mail-tester.com. This verifies your emails meet deliverability standards and have the best chance of reaching your audience's inbox.
Conclusion
Creating an effective Joomla contact form involves more than just capturing user info. You need to confirm emails reach the right people on your team without any hiccups. Advanced features like conditional logic and Smart Tags can help streamline your workflow and make your forms more versatile.
We covered key steps to enhance your contact forms, including setting up email notifications and autoresponders and routing emails to specific departments using conditional logic. We also discussed creating reusable forms that can automatically email the author of a particular article.
Implementing these techniques can improve your team's efficiency and offer a smoother user experience. With the right tool, you can build smarter Joomla contact forms.
Featured Articles


 Rated: