-
- Adding an “Other” Option
- Adding a Unique ID to Each Form Submission
- Show or Hide Form Fields Based on User Joomla User Group
- Disabling Browser Autocomplete for Form Fields
- Scroll the Page to the Top When a Long Form is Submitted
- Display Submissions Count for a Specific Form
- Populate Drop Down, Radio Buttons or Checkboxes with a CSV File
- Automatically Delete Submissions Older Than X Days
- Silently POST Submitted Data to Any API or URL
- Automatically Save Each Submission to a JSON file
- Authenticate and Login a User with a Custom Joomla Form
- Auto-Populate a Form Field with an Article Data
- Add a placeholder text to a Dropdown
- Create Multilingual Forms in Joomla
- Create a custom Joomla User Registration Form
- Redirect User to a URL After Form Submission
- Importing and Exporting Forms
- Exporting Form Submissions
- Convert Forms
-
- How to Create a Quiz Form
- Displaying a Popup After Form Submission Using EngageBox
- Conditional Content Shortcode in Convert Forms
- Copy Value From One Field to Another
- Tasks
- Exporting Form Submissions with a Webhook URL
- Conditional Fields
- PDF Form Submissions
- Input Masks
- Field Calculations
- Auto-Populate Form Fields Using Query String
- Use Smart Tags
-
- Enable Minimum Time to Submit
- Restrict Form Submissions Based on IP
- Enforcing a Custom Password Policy in Convert Forms
- Add Cloudflare Turnstile to your Joomla Form
- Implement the Iubenda Consent Database in Joomla with Convert Forms
- Add Custom Validations to Fields and Forms
- Add Math Captcha to your Form
- Prevent a Field From Saving in the Database
- Add hCaptcha to your Form
- Enable Double Opt-in
- Allow Form Submissions in Specific Date Range
- Ensure a Unique Value is Entered Into a
- Block Form Submissions Containing Profanity (Bad Words)
- Block Email Addresses or Email Domains
- Add Honeypot Protection
- Setting Up Google reCAPTCHA
- Create GDPR Compliant Forms
Show or Hide Form Fields Based on User Joomla User Group
Have you ever needed to show or hide a form field based on a user’s group or access level? Maybe you only want to require a CAPTCHA for guests while improving the experience for logged-in users. Or perhaps you’re running a listings site and wish to restrict image uploads to registered members. Maybe your form is only accessible to logged-in users, but you want to display a special field exclusively for those in a specific user group.
Let's see how we can make this happen with Convert Forms.
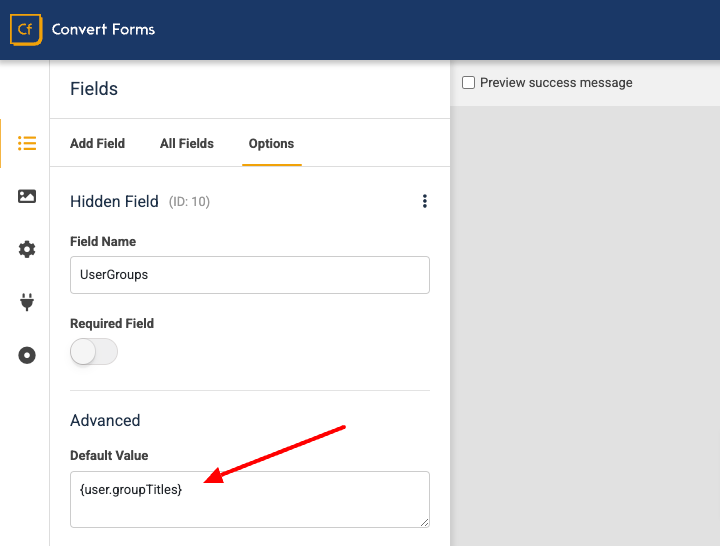
Step 1: Create a Hidden Field to Store the User Groups
The first step is to add a hidden field to our form to hold user group information.
- Go to the All Fields tab.
- Click to add a Hidden Field.
- Set the name of the field to "usergroups".
Now, let's add a bit of magic to the hidden field. For the Default Value setting, we will use a Convert Forms Smart Tag to populate the user's groups, {user.groupTitles}. This Smart Tag returns the titles of the user groups comma-separated. Eg: Public, Registered.
If the user isn't logged in, it will return the default groups for a guest user, which in most cases are "Public, Guest".
If you believe the names of the user groups are a bit personal and sensitive information, you can use the Smart Tag {user.groups} which returns the ID of each group assigned to the user. Eg: 1,2,5.
Step 2: Apply Conditional Logic to Other Fields Based on the User Groups Hidden Field
Suppose our form includes a CAPTCHA field, but we only want to show it to guest users while allowing logged-in users to submit the form without it.
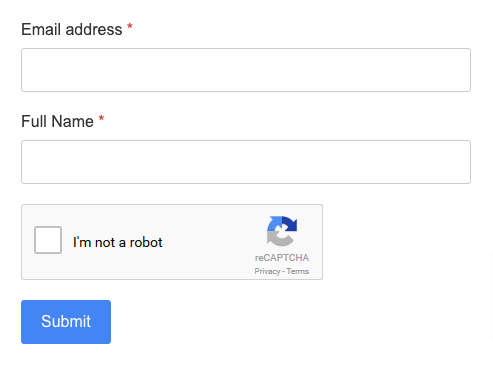
To achieve this, we’ll use Conditional Fields to check the value of the hidden field created in Step 1. If the value contains “Guest” which is the default user group for non-logged-in users, the CAPTCHA field will be displayed. Otherwise, the field will remain hidden if the user is logged in.
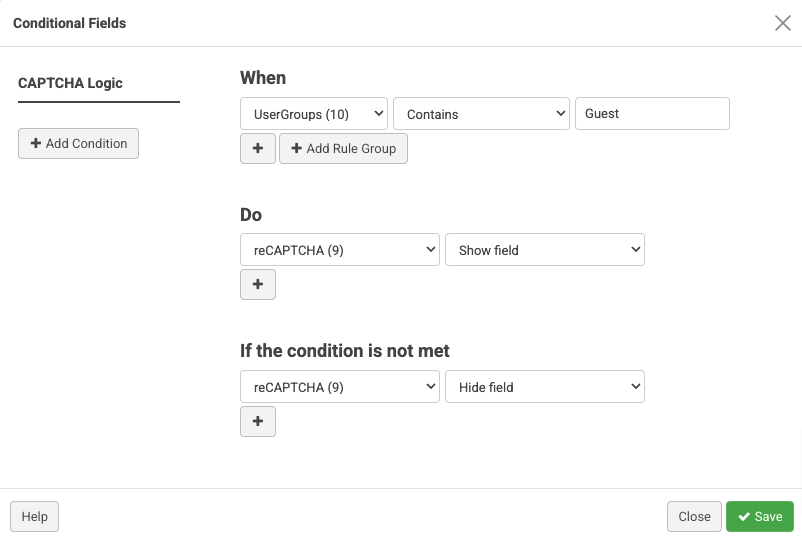
Go to the Behavior tab and click Setup Conditions in the Conditional Fields panel.
- Click Add Condition
- In the 1st dropdown select the User Groups hidden field you created in the first step.
- Set the Operator to Contains
- Set the value to "Guest".
- Next, in the Do section, select the CAPTCHA field you want to hide.
- Set the Action option to Hide field.
- In the If the condition is not met section, select again the CAPTCHA field.
- In the Action option now select Show field.
This conditional logic would read in plain English: "Display the CAPTCHA field if the UserGroups hidden field contains ‘Guest’; otherwise, keep it hidden".
Summary
The same approach can show or hide fields based on a user’s access levels instead of user groups. In this case, you can use the Smart Tags {user.authLevels} and {user.authLevelTitles}, which return the IDs and titles of the user’s access levels as a comma-separated list. By applying conditional logic to these values, you can control field visibility based on specific access levels, offering greater form flexibility.


 Rated: