-
- Adding an “Other” Option
- Adding a Unique ID to Each Form Submission
- Show or Hide Form Fields Based on User Joomla User Group
- Disabling Browser Autocomplete for Form Fields
- Scroll the Page to the Top When a Long Form is Submitted
- Display Submissions Count for a Specific Form
- Populate Drop Down, Radio Buttons or Checkboxes with a CSV File
- Automatically Delete Submissions Older Than X Days
- Silently POST Submitted Data to Any API or URL
- Automatically Save Each Submission to a JSON file
- Authenticate and Login a User with a Custom Joomla Form
- Auto-Populate a Form Field with an Article Data
- Add a placeholder text to a Dropdown
- Create Multilingual Forms in Joomla
- Create a custom Joomla User Registration Form
- Redirect User to a URL After Form Submission
- Importing and Exporting Forms
- Exporting Form Submissions
- Convert Forms
-
- How to Create a Quiz Form
- Displaying a Popup After Form Submission Using EngageBox
- Conditional Content Shortcode in Convert Forms
- Copy Value From One Field to Another
- Tasks
- Exporting Form Submissions with a Webhook URL
- Conditional Fields
- PDF Form Submissions
- Input Masks
- Field Calculations
- Auto-Populate Form Fields Using Query String
- Use Smart Tags
-
- Enable Minimum Time to Submit
- Restrict Form Submissions Based on IP
- Enforcing a Custom Password Policy in Convert Forms
- Add Cloudflare Turnstile to your Joomla Form
- Implement the Iubenda Consent Database in Joomla with Convert Forms
- Add Custom Validations to Fields and Forms
- Add Math Captcha to your Form
- Prevent a Field From Saving in the Database
- Add hCaptcha to your Form
- Enable Double Opt-in
- Allow Form Submissions in Specific Date Range
- Ensure a Unique Value is Entered Into a
- Block Form Submissions Containing Profanity (Bad Words)
- Block Email Addresses or Email Domains
- Add Honeypot Protection
- Setting Up Google reCAPTCHA
- Create GDPR Compliant Forms
Adding a Unique ID to Each Form Submission
Each form submission in Convert Forms already has a built-in unique ID. This is a sequential number (e.g. 1, 2, 3…) that serves as the primary key for identifying each entry in the system.
While this built-in ID is perfectly fine for internal use, there are situations where you may want to generate a different type of identifier—one that’s random, less predictable, or formatted differently. For example, you might want to display a custom reference number to users after they submit a form, such as an order confirmation code or a case number. A custom ID can also be useful when syncing data with third-party systems that require a specific token format or when you don’t want users to guess the number of submissions your form has received.
Thankfully, you can generate a unique reference number for each submission using Convert Forms—without writing a single line of code.
Add a Hidden Field to Your Form
Edit your form and add a Hidden field. Give it a name such as unique_id.
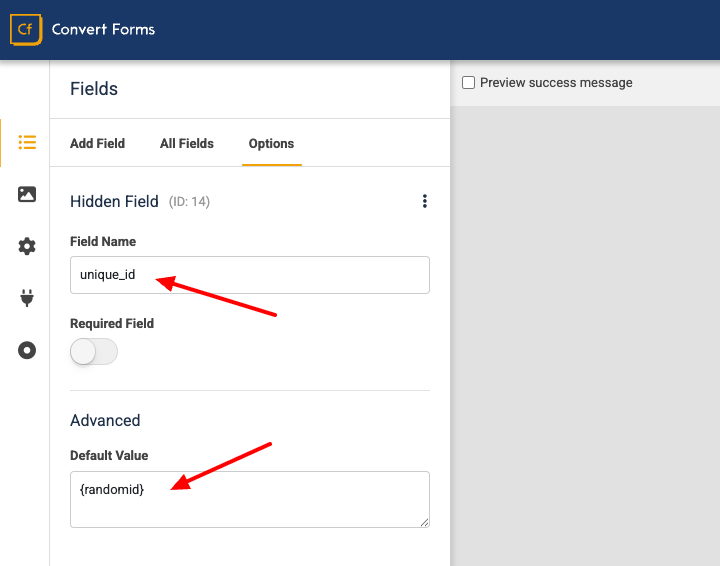
Then, in the Default Value setting, insert the following Smart Tag:
{randomid}The Random ID Smart Tag creates a random 8-character token for each submission and stores it in this hidden field. Example: 03bc431d0d605ce4.
Adding the Unique ID to Email Messages
To include the unique ID in your email notifications, use the Smart Tag for the hidden field. If your field is named unique_id, use:
{field.unique_id}This will output the random ID in your email message, making it easy to reference in communications with users or backend workflows.


 Rated: