-
- Adding an “Other” Option
- Adding a Unique ID to Each Form Submission
- Show or Hide Form Fields Based on User Joomla User Group
- Disabling Browser Autocomplete for Form Fields
- Scroll the Page to the Top When a Long Form is Submitted
- Display Submissions Count for a Specific Form
- Populate Drop Down, Radio Buttons or Checkboxes with a CSV File
- Automatically Delete Submissions Older Than X Days
- Silently POST Submitted Data to Any API or URL
- Automatically Save Each Submission to a JSON file
- Authenticate and Login a User with a Custom Joomla Form
- Auto-Populate a Form Field with an Article Data
- Add a placeholder text to a Dropdown
- Create Multilingual Forms in Joomla
- Create a custom Joomla User Registration Form
- Redirect User to a URL After Form Submission
- Importing and Exporting Forms
- Exporting Form Submissions
- Convert Forms
-
- How to Create a Quiz Form
- Displaying a Popup After Form Submission Using EngageBox
- Conditional Content Shortcode in Convert Forms
- Copy Value From One Field to Another
- Tasks
- Exporting Form Submissions with a Webhook URL
- Conditional Fields
- PDF Form Submissions
- Input Masks
- Field Calculations
- Auto-Populate Form Fields Using Query String
- Use Smart Tags
-
- Enable Minimum Time to Submit
- Restrict Form Submissions Based on IP
- Enforcing a Custom Password Policy in Convert Forms
- Add Cloudflare Turnstile to your Joomla Form
- Implement the Iubenda Consent Database in Joomla with Convert Forms
- Add Custom Validations to Fields and Forms
- Add Math Captcha to your Form
- Prevent a Field From Saving in the Database
- Add hCaptcha to your Form
- Enable Double Opt-in
- Allow Form Submissions in Specific Date Range
- Ensure a Unique Value is Entered Into a
- Block Form Submissions Containing Profanity (Bad Words)
- Block Email Addresses or Email Domains
- Add Honeypot Protection
- Setting Up Google reCAPTCHA
- Create GDPR Compliant Forms
Connect Convert Forms with Zapier
Are you looking to expand the integration capabilities of your Joomla forms? With Zapier, you can connect Convert Forms to thousands of web apps, automating workflows and enhancing form functionality without any coding.
In this step-by-step guide, you’ll learn how to install and configure the Zapier integration for Convert Forms, enabling data transfer between your forms and your favorite apps.
Zapier App 1.1.1 Deprecated – Switch to v2.0 Now
As part of our general Campaigns feature deprecation, we introduced a new version of the Zapier App (v2.0) that changes how you select forms for automation. Previously, after entering your API Key and website, you had to choose a "Campaign" to read submissions. Since the Campaigns feature in Convert Forms is deprecated (more info here), the latest version of our Zapier integration now requires you to select a specific form instead.
With this update:
- Instead of selecting a Campaign (which grouped multiple forms), you now select a specific form.
- If you previously triggered Zaps based on a Campaign, you must set up separate Zaps for each form you want to track.
The previous Zapier App version (1.1.1) is now deprecated. As a result, Zapier has sent deprecation notices to users of the old version, urging them to update.
Action Required – Update Before March 11, 2026
Zaps using the deprecated version must be updated before March 11, 2026. After this date, they will be automatically paused. To update, log into your Zapier account, locate your existing Zaps, and reconfigure them using the new version of the Convert Forms Zapier App (v2.0).
Keeping your Zaps updated ensures they continue working without interruption. If you have any issues, refer to our documentation or contact Zapier Support.
Enable API and Set Secret Key
Before you get started, you must allow 3rd party apps including Zapier to connect to your website and access forms and submissions. To do so, you must enable the Convert Forms JSON-API option and set a site secret key that will be used later in the Zapier connection. For more details, visit the Using the JSON-API guide.
Creating a Zap in Zapier
In Zapier, the integrations you create are called "zaps". The next step is to create a zap that sends information from your forms to another service. First, you’ll need to log in to your Zapier account. If you don’t have one yet, you can sign up for free.
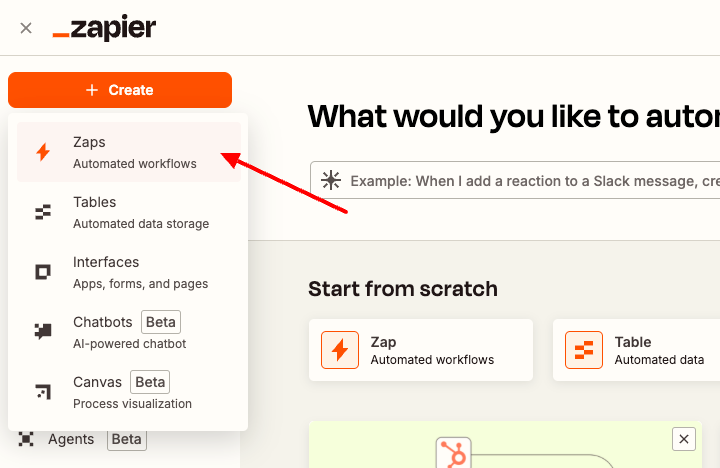
After you’ve logged in to your account, click the Create button in the upper left corner (if your browser window is small, this button may appear as an orange plus (+) sign instead), then select Zaps from the dropdown.
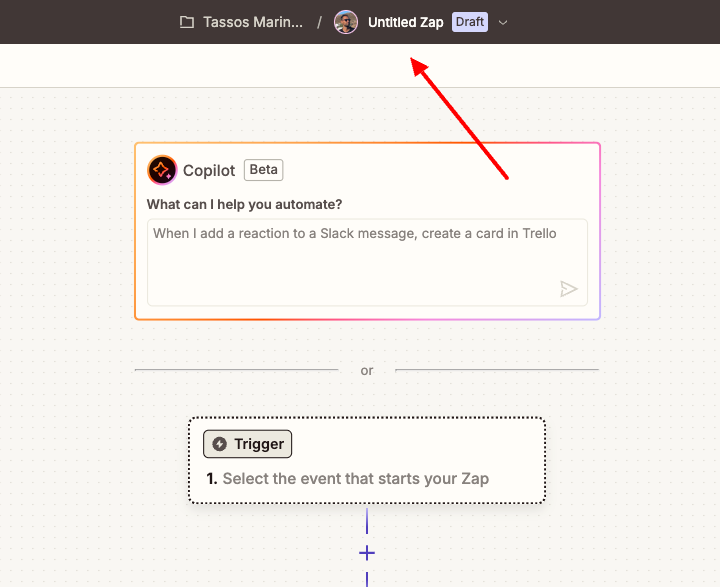
This will open the setup page for your new zap. If you’d like to name your zap, add a title by clicking on the title in the top center of the page.
Setting Up Your Trigger Event
To begin, click on the Trigger box shown in the Zap editor.
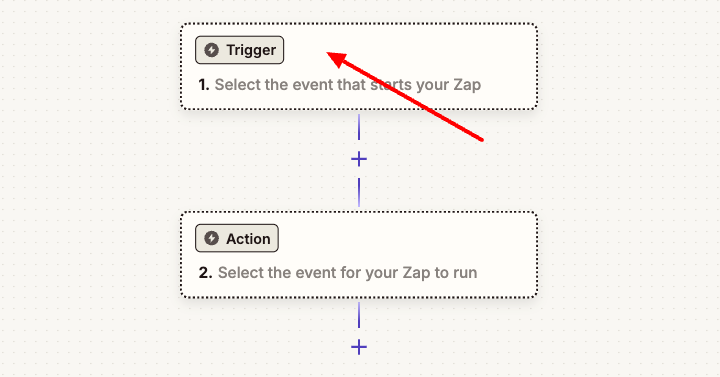
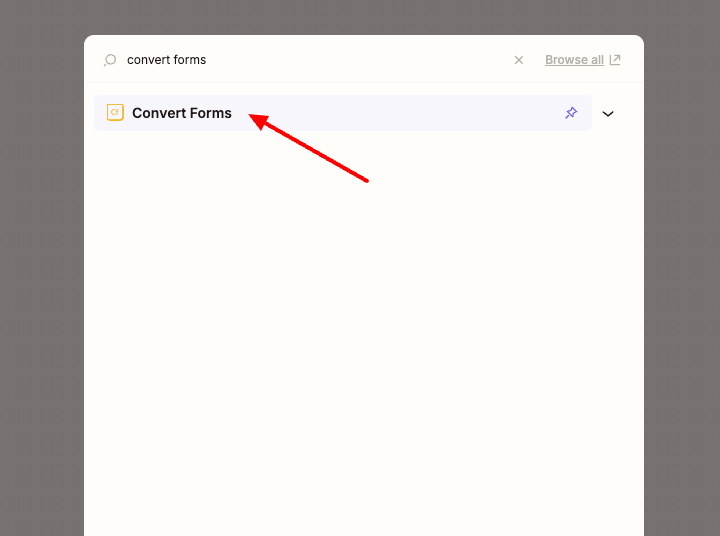
This will open a modal where you can search for apps and events. In the search box at the top, type “Convert Forms” and click on Convert Forms from the results that appear.
After selecting Convert Forms, a configuration panel will appear on the right side of the screen. Under Trigger event, click the dropdown menu to see available options. Convert Forms has only one trigger event available – New Submission. Select this option from the dropdown list.
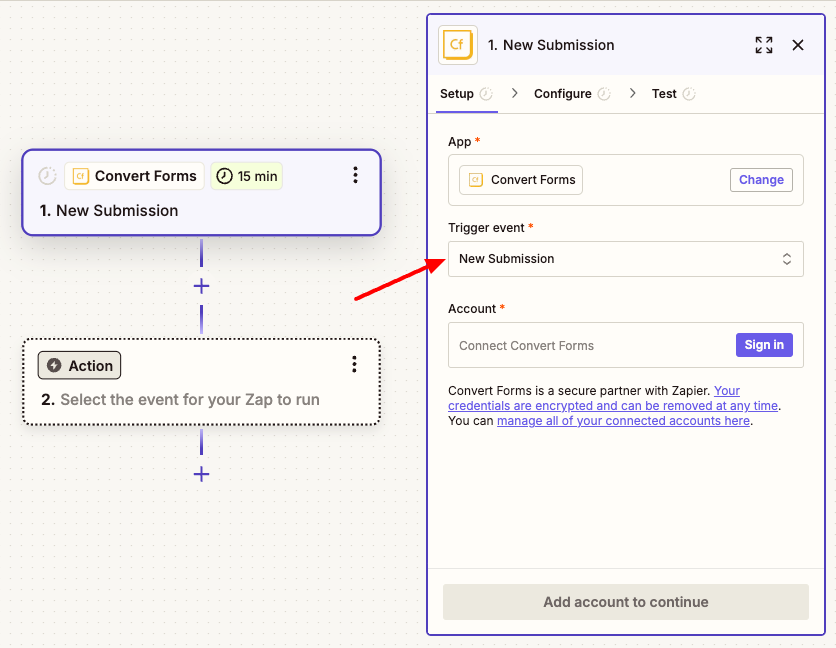
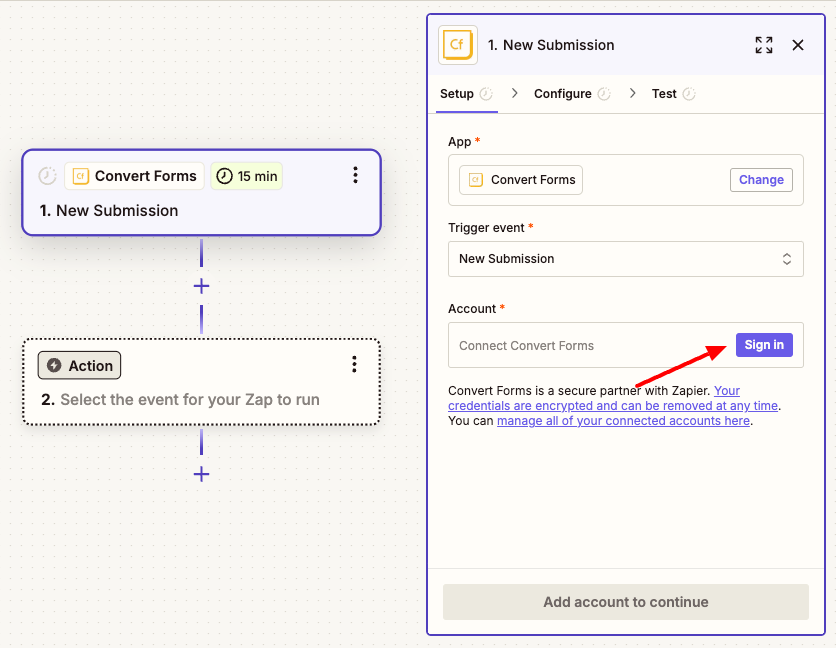
Next, under Account, click the Sign in button to connect your Convert Forms account.
This will cause a new window to appear. Here, you’ll need to add your API Key you set when enabling the JSON API Key.
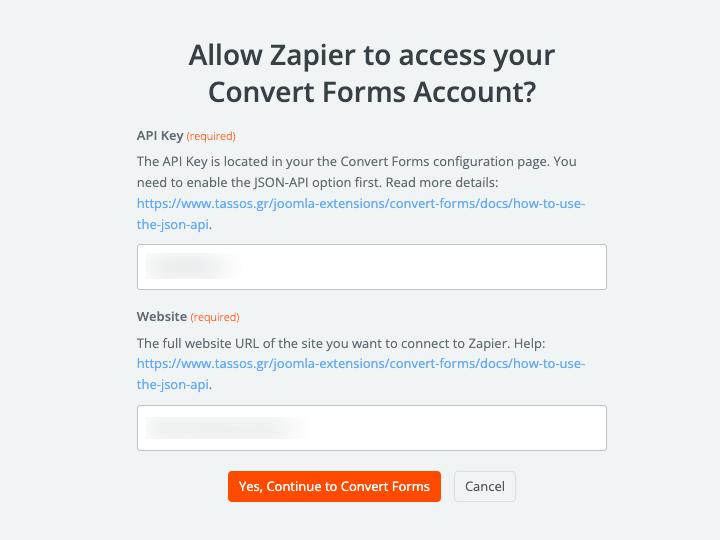
Next, you’ll need to fill out the Website field. Be sure to enter the full URL of your website and include the trailing slash (i.e., https://example.com/). Then click the Yes, Continue to Convert Forms button.
Once your site is connected, click the Continue button to proceed.
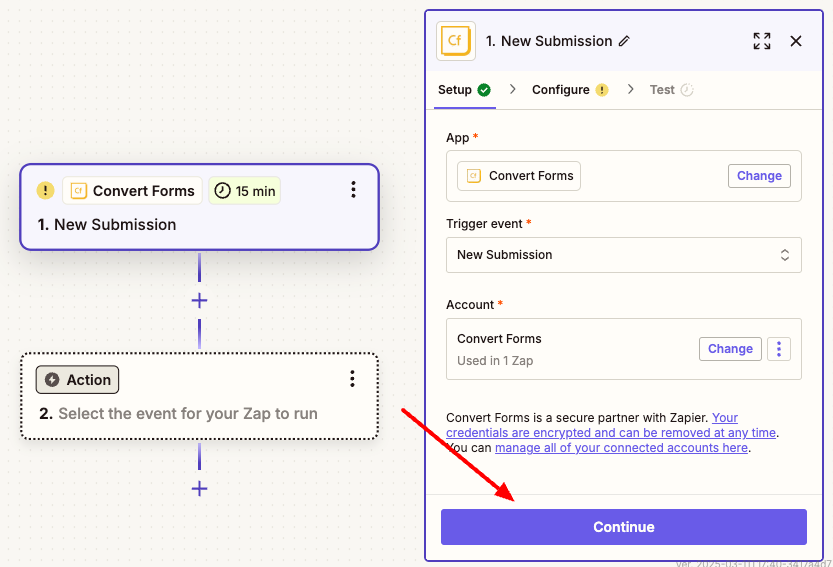
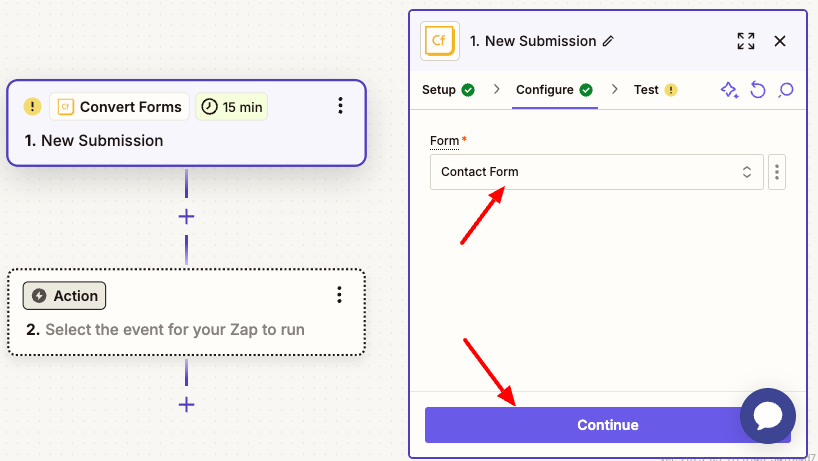
Next, select the form you’d like to use from the Form dropdown and click Continue again.
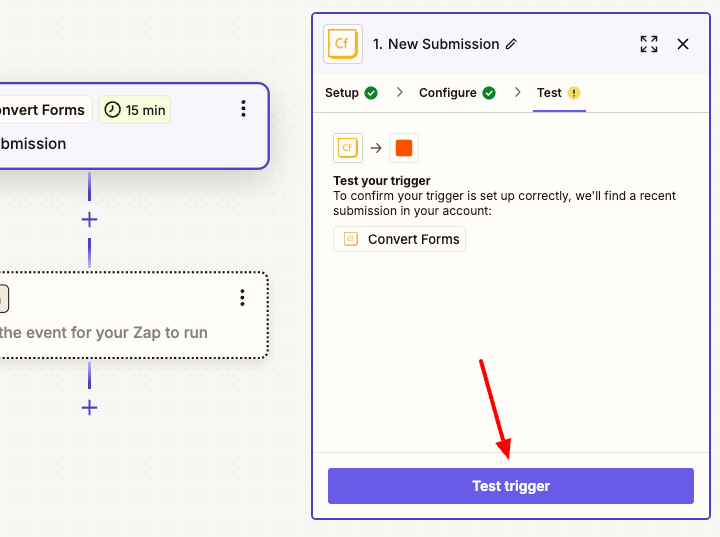
Zapier will then allow you to pull in sample entries to test your connection.
Note: The form you selected in the previous step needs at least one submission for the test to work.
Click the Test trigger button to load available entries.
Zapier will then show you the entries it could pull from your form. Select any available submission to view its data and ensure everything looks correct.
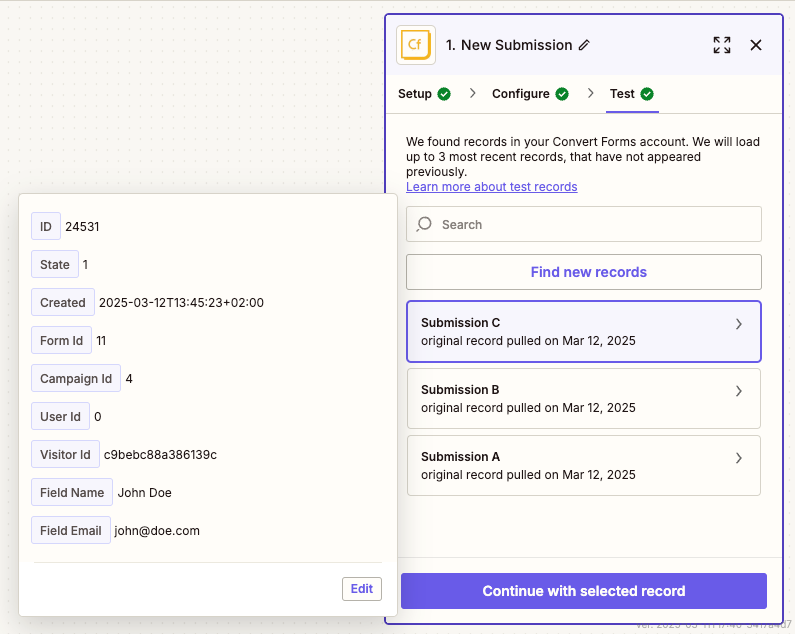
When happy with the trigger test’s results, click the Continue button to proceed.
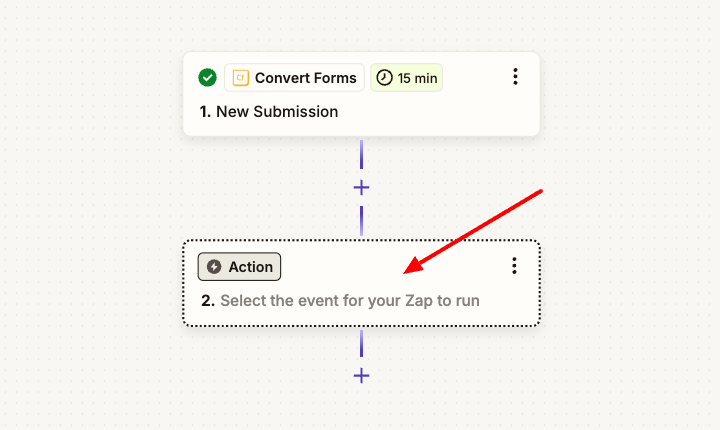
Setting Up Your Action Event
After testing your trigger, you’ll need to select an action – this is what will happen each time your form receives a submission. Click on the Action box to choose which app you want to use for your action.
Next, you’ll see a modal where you can find and select the app you want to use for action. You can search for your desired app using the search box at the top or select it from the available apps below.

This app is the service to which you’d like to send your form submission details.
Note: Zapier has over 7,000 apps and services available. To see the full list of apps you can connect with Convert Forms, check out Zapier’s Convert Forms integrations page for all the details.
After selecting an app, Zapier will walk you through the steps to pass form data to your chosen service. These steps will depend on which service you integrate with.
Troubleshooting
In some cases, you may not be able to create your Zap or Zapier may suddenly stop working. Below is a list of useful resources that should help you resolve your issue.
Ensure JSON API is enabled
Enable JSON API, found under Global Configuration > Convert Forms > Security, which must be enabled for 3rd-party services such as Zapier to read your forms and submissions data.
Enabling this does not mean any third-party service can read Convert Forms data. A combination of JSON API and Secret Key must be present to retrieve data.
Ensure a Secret Key has been set correctly
Secret Key, found under Global Configuration > Convert Forms > Security, must be set and contain alphanumerics without special characters.
You must set this. You will need to use it when you create your Zap, alongside Enable JSON API, which are required for Zapier to be able to retrieve and sync your Convert Forms data with a 3rd-party service.
Verify Convert Forms API endpoints return data
After setting the above options, ensure the Convert Forms API returns data. To do so, get the Base URL of your site:
All the requests to the JSON API are of the type "GET" and must be sent to the following URL.
http://example.com/?option=com_ajax&format=raw&plugin=ConvertForms&task=apiReplace http://example.com with the domain of your Joomla website. Then, try to get your forms list visiting the link below:
http://example.com/?option=com_ajax&format=raw&plugin=ConvertForms&task=api&api_key={apikey}&endpoint=formsReplace {apikey} with your Secret Key you set above.
If all the above endpoints returned your forms then the Convert Forms JSON API is enabled and works correctly. Zapier should be able to find your data and sync them with your favorite app.
You can find a complete documentation of the Convert Forms API, here: How to use the JSON API
Issues with Zaps
If you have other problems with a Zap you created, we recommend contacting Zapier Support. They are usually the best people to help you with issues related to the Zapier dashboard, configuration, or behaviour.


 Rated: