 Tassos Docs
-
- External Link Click
- Idle
- AdBlock Detect
- Hover
- Click
- Exit-Intent
- Element Visibility
- Scroll Depth
- Page Ready
- Page Load
- EngageBox Popup Triggers
- 3 Ways to Trigger a Box on Click
- OnClick
- Display a popup before user leaves your website
- Display a popup when a certain element reaches your browser's viewport
-
- E-Commerce Conditions (VirtueMart - HikaShop)
- Homepage
- New/Returning Visitor
- K2 - Page Type
- K2 - Tag
- K2 - Category
- K2 - Item
- PHP
- Region
- City
- User Access Level
- Joomla! Content Component View
- Month
- Day of Week
- Cookie
- IP Address
- Referrer URL
- AcyMailing List
- Convert Forms Conditions
- Language
- Component
- Joomla! Content Category
- Joomla! Content Article
- Continent
- Country
- Operating System
- Browser
- Device
- Time on Site
- EngageBox - Viewed Another Popup
- Pageviews
- User
- User Group
- Time
- Date
- URL
- Menu
- Display Conditions
- Trigger based on URL match
-
- Αdd Sound Effects to Your Popups
- Make Accessible Popups
- Add a Countdown timer in your popup
- Limit impressions per unique visitor
- Test the responsiveness of your boxes for various devices and viewports
- Open a box by clicking on a menu item
- Trigger based on the minimum time visitor spent on the site
- Auto-Close popup after a specific time
- Open a box using HTML Attributes
Create a MailChimp Optin Box
There are three distinct methods to create a MailChimp Optin Box with Engage Box. Each of them provides a different kind of flexibility and ease of use. Let's take a look.
- Using MailChimp Embed Code
- Using Engage Box Native Subscription Form
- Using Convert Forms (Best Method)
1. Using MailChimp Embed Code
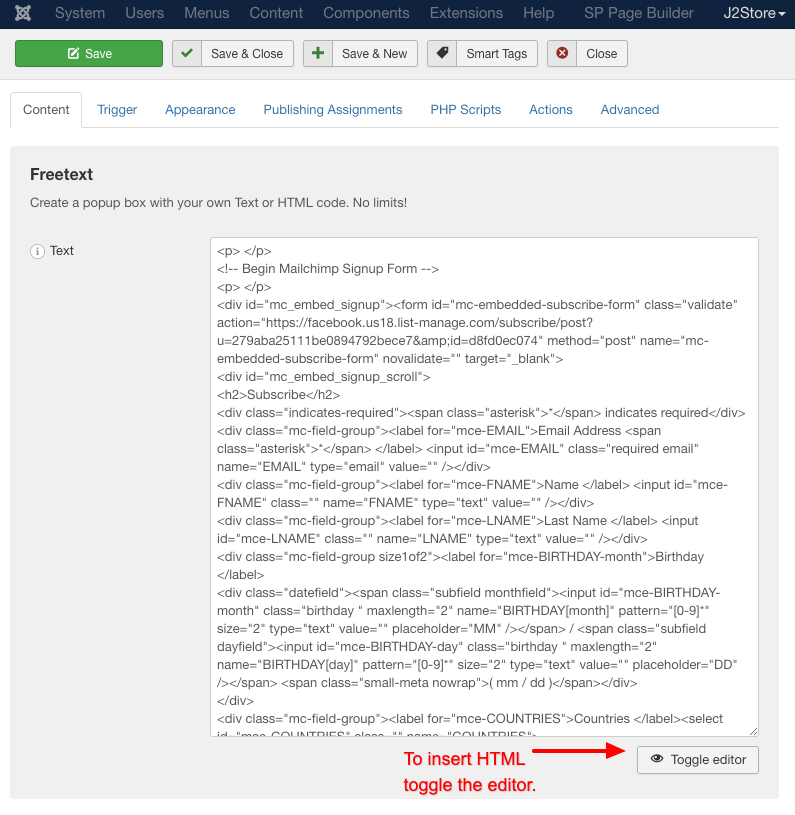
MailChimp provides to its users a way to create a form and embed its HTML Code into any website. Once you follow MailChimp's Guide on how to create a signup form with their Form Builder, you'll be left with a block of HTML Code as shown in the screenshot below.
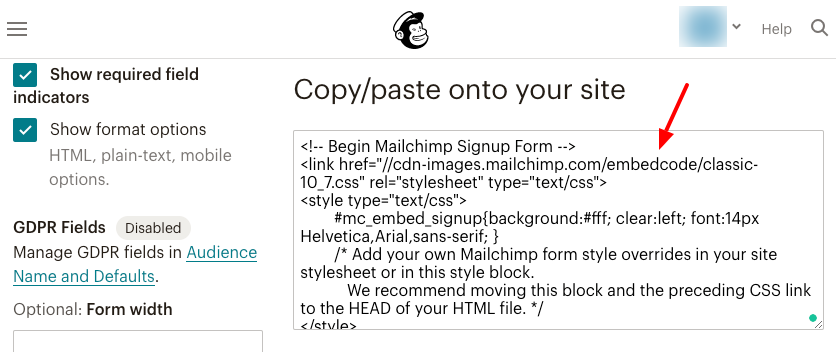
Now that you have the HTML Code, proceed by following the steps below to know how you can use it with Engage Box.
- Log in to your Joomla Administration panel and navigate to Components > Engage Box.
- Click the New button to create your new Engage Box.
- Type a name for your Engage Box at the right of your screen.
- Click the Toggle Editor button at the bottom right of the editor to disable the editor temporarily. This is mandatory because you can not paste HTML in the editor. Also we strongly suggest that you do not re-enable the editor for this particular box as this will most probably cause the form to break.
- Go ahead and configure any other options for your Engage Box that you may want.
- Click Save & Close and you are done!
It is worthy to mention that in case you only deal with MailChimp as an email campaign service then this method will suite you well. However, in case you'd like to have a broader knowledge of the whole integration with a third-party service subject, we suggest that you follow the following method.
2. Using Engage Box Native Subscription Form
For this method we will need the following.
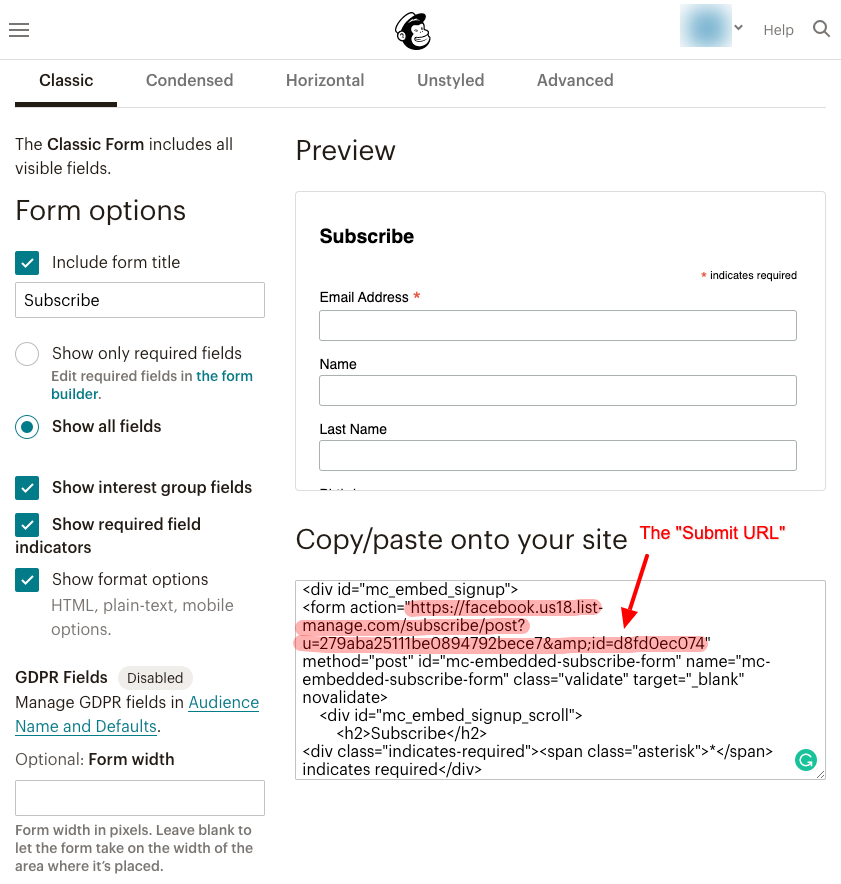
- A Submit URL.
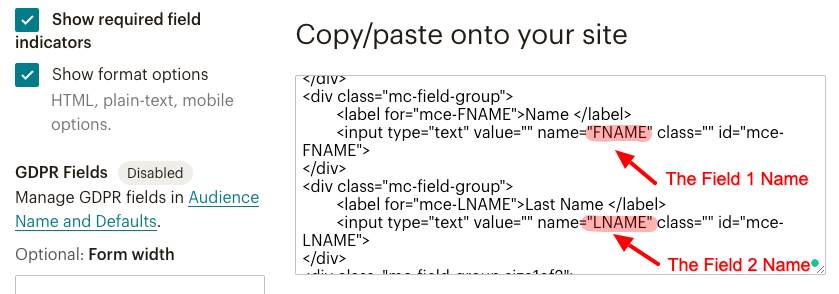
- The field names. Also known as MERGE TAGS.
To find them you have to follow MailChimp's Guide on how to create a signup form with their Form Builder in order for you to reach the screen where you are given an HTML Block like the one below. Take a look at the annotations to be able to identify the Submit URL and the field names.
By default MailChimp uses the words FNAME and LNAME respectively as field names for the First Name and the Last Name respectively. However, you might have chosen to change them in the past so this is a good way to at least verify them.
Now that we have what we need, let's set up the Engage Box.
- Log in to your Joomla Administration panel and navigate to Components > Engage Box.
- Click the New button to create your new Engage Box.
- Type a name for your Engage Box at the right of your screen.
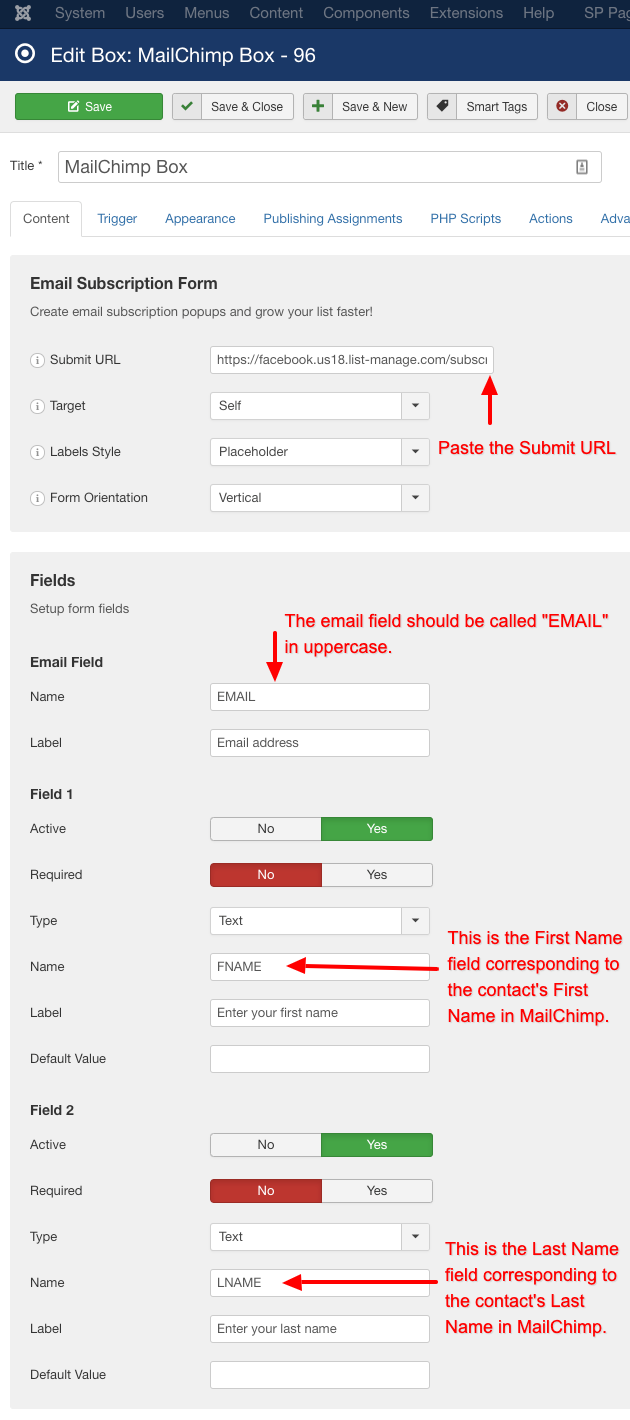
- Select Email Subscription Form as Box Type.
- Fill in the fields as shown in the screenshot below.
- Go ahead and configure any other options for your Engage Box that you may want.
- Click Save & Close and you are done!
3. Using Convert Forms (Best Method)
Our Convert Forms extension makes creating a MailChimp Opt-In Box an absolute breeze! This method is considered as the best of the three because of its use of AJAX for the form submission. By using AJAX the guest doesn't get disrupted from his current progress and therefore he stays as close as ever to his converting goal.
We have already created detailed documentation for each of the 3 needed steps. Take a look below!



 Rated: