 Tassos Docs
-
- External Link Click
- Idle
- AdBlock Detect
- Hover
- Click
- Exit-Intent
- Element Visibility
- Scroll Depth
- Page Ready
- Page Load
- EngageBox Popup Triggers
- 3 Ways to Trigger a Box on Click
- OnClick
- Display a popup before user leaves your website
- Display a popup when a certain element reaches your browser's viewport
-
- E-Commerce Conditions (VirtueMart - HikaShop)
- Homepage
- New/Returning Visitor
- K2 - Page Type
- K2 - Tag
- K2 - Category
- K2 - Item
- PHP
- Region
- City
- User Access Level
- Joomla! Content Component View
- Month
- Day of Week
- Cookie
- IP Address
- Referrer URL
- AcyMailing List
- Convert Forms Conditions
- Language
- Component
- Joomla! Content Category
- Joomla! Content Article
- Continent
- Country
- Operating System
- Browser
- Device
- Time on Site
- EngageBox - Viewed Another Popup
- Pageviews
- User
- User Group
- Time
- Date
- URL
- Menu
- Display Conditions
- Trigger based on URL match
-
- Αdd Sound Effects to Your Popups
- Make Accessible Popups
- Add a Countdown timer in your popup
- Limit impressions per unique visitor
- Test the responsiveness of your boxes for various devices and viewports
- Open a box by clicking on a menu item
- Trigger based on the minimum time visitor spent on the site
- Auto-Close popup after a specific time
- Open a box using HTML Attributes
Load Convert Forms through EngageBox
In this article you will learn how to display a form created with Convert Forms in a popup using EngageBox.
1. Using Convert Forms shortcode
First of all, we need to find the shortcode of the Convert Form we're going to use. Let's see how to do that.
- Navigate to Components > Convert Forms > Forms
- While you are on the list view of your forms, find the form you are interested in and hover of the "chain-link icon" at the right of the forms row. See the screenshot below.

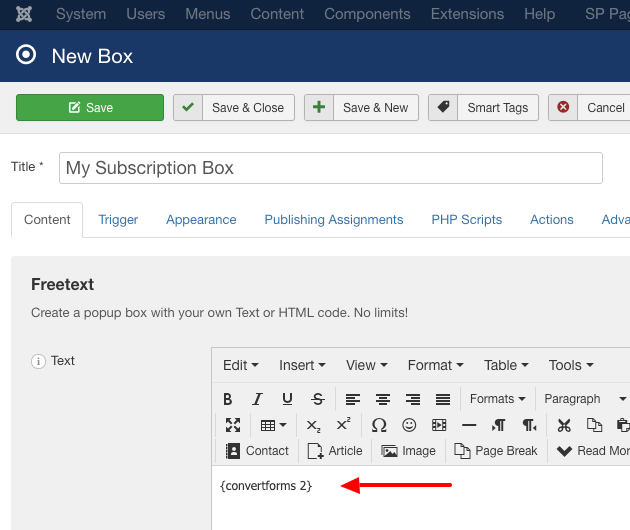
Now that we have the shortcode all that's left is to type that shortcode into our Engage Box editor like it is depicted in the screenshot below and save it! That's it!

2. Using Convert Forms module
It is assumed that you have already published the module of the Convert Form you're interested in. If not, then first take a look at our How to display a form on the frontend documentation to learn exactly how to do that.

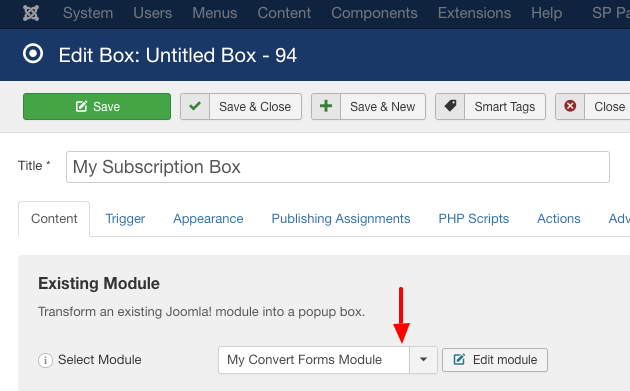
Using a module of Convert Forms inside an Engage Box does not differ in any way than any other conventional module. As seen in the screenshot above, just set the Box Type to Existing Module and right below select your Convert Forms module. That's it!
Auto-close popup after form submission
In case we'd like to auto-close the popup box after a successfull form submission, we'll need to use a small Javascript snippet which closes the popup 3 seconds after the "success" event of the form is fired.
Go to your box > Actions > Click on Add action > On Event and Action select After Open and Run Javascript respectively and enter the code below:
var form = me.el.querySelector(".convertforms");
form.addEventListener("success", function(event) {
	setTimeout(function() {
    	me.close();
    }, 3000);
});
The script above makes use of the Javascript Events API which is available for both Convert Forms and EngageBox extensions.
Hide popup for session after form submission
If you want to hide the popup as long as the session lasts and only after the form has been successfully submitted, place the following code into the Custom Code option in the Advanced tab of your popup.
EngageBox.onReady(function() {
	let popup = EngageBox.getInstance({eb.id});
	var form = popup.el.querySelector('.convertforms');
	form.addEventListener('success', (event) => {
		document.cookie = "engagebox_{eb.id}=true; path=/";
	});
});
If you would like to also auto-close the popup, use this snippet instead:
EngageBox.onReady(function() {
	let popup = EngageBox.getInstance({eb.id});
	var form = popup.el.querySelector('.convertforms');
	form.addEventListener('success', (event) => {
		document.cookie = "engagebox_{eb.id}=true; path=/";
		popup.close();
	});
});


 Rated: